Scenario - Three multi-region based VPCs.
- VPC Sydney (Sub-branch)
- VPC N.Virginia (Sub-branch)
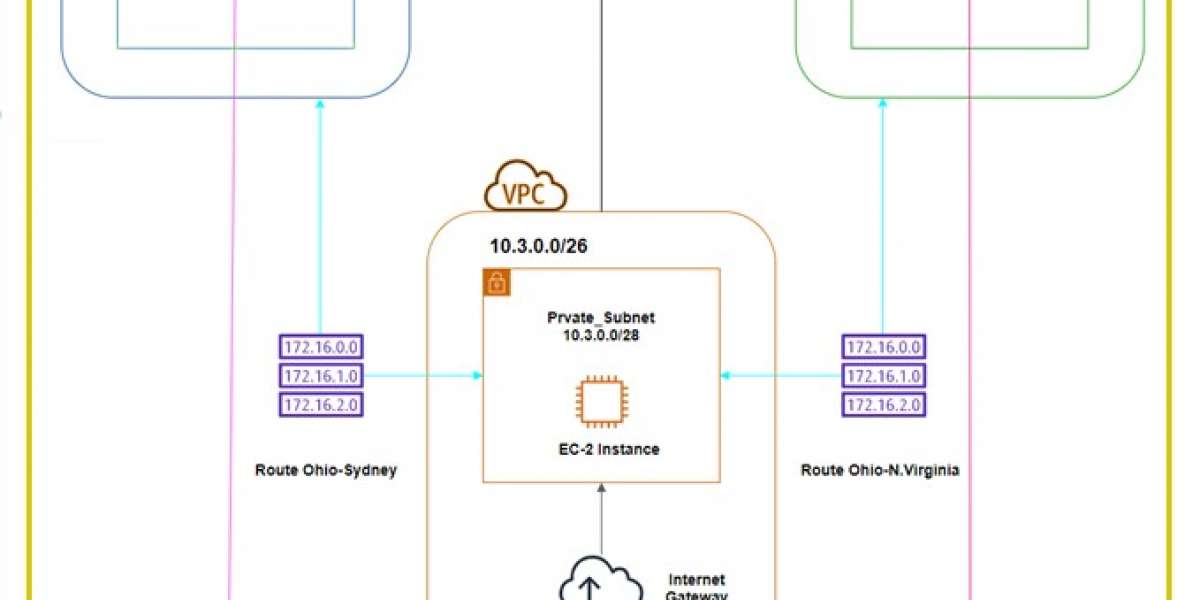
- VPC Ohio (Head branch)
- Login into your AWS Account by filling up your registered email-id and password go to https://console.aws.amazon.com/console/home.
- Now, you’re on AWS Console where you can see all the services provided by AWS.
- Open three tabs in your browser with different Regions i.e. Ohio, N.Virginia, and Sydney.
- Access the VPC management console https://console.aws.amazon.com/vpc/.
- Create three different VPCs and provide different IP’s
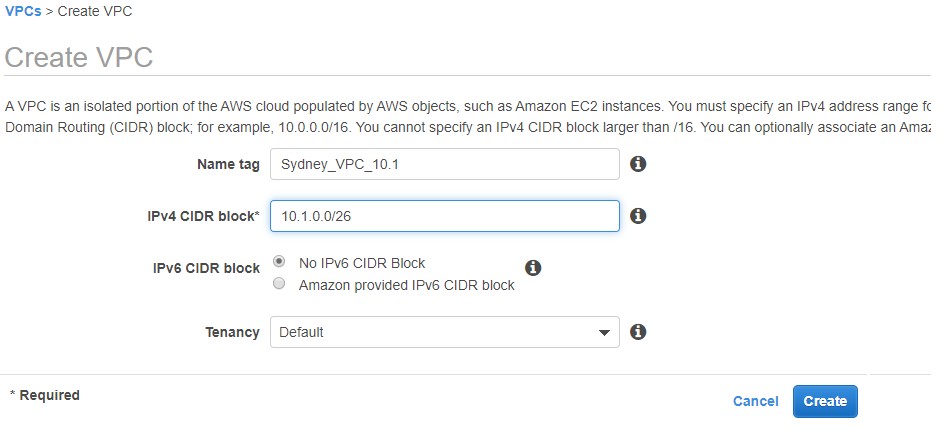
Sydney Region: 10.1.0.0/26
N.Virginia Region: 10.2.0.0/26
Ohio Region: 10.3.0.0/26
Configuration of Sydney Region.
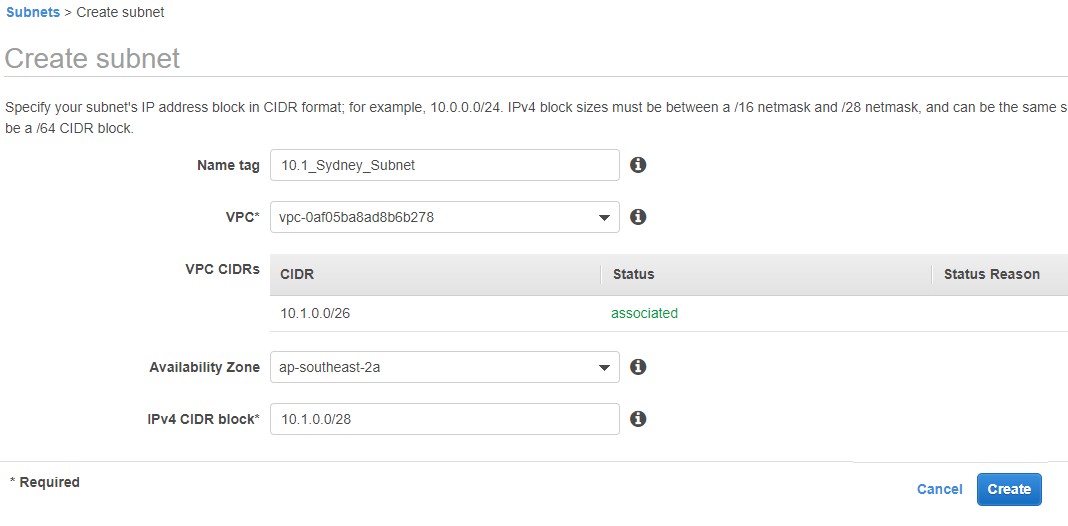
- Open Sydney Region and create a new VPC.
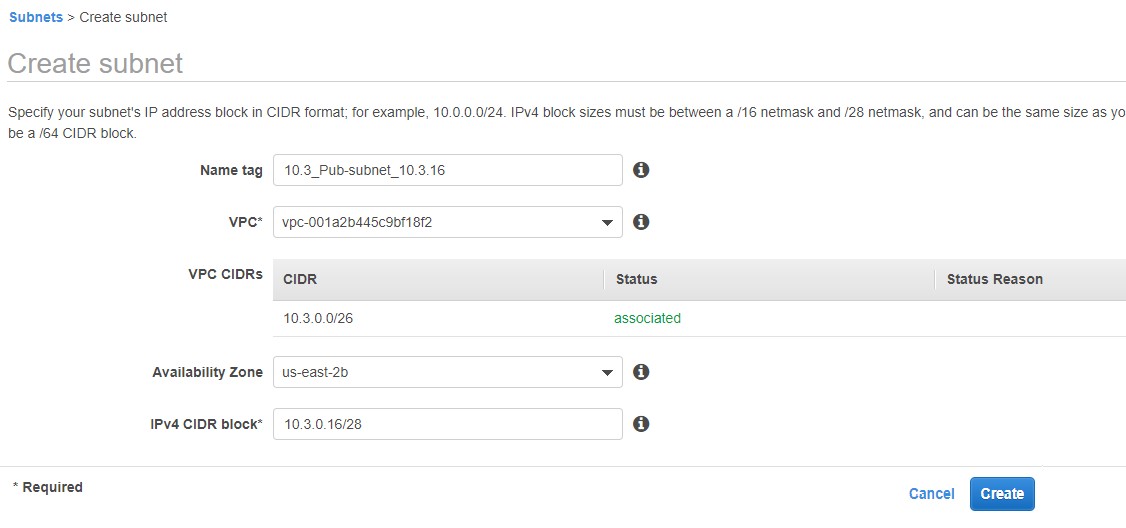
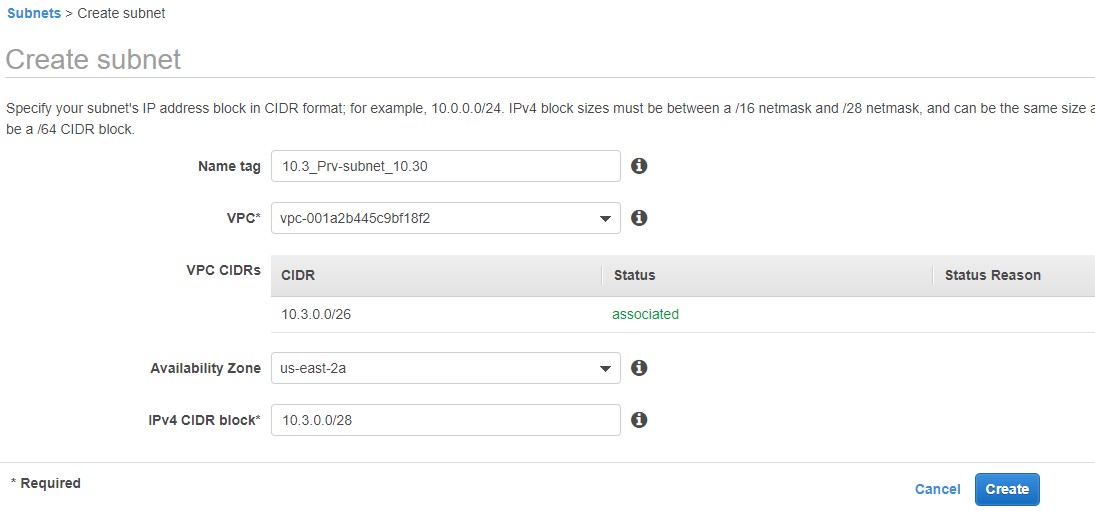
- After you created VPC then create subnets in the same region. We need to create three subnets under this VPC.
- Open https://aws.amazon.com/rds/ and click on create a database. Here I am going to use the MariaDB.
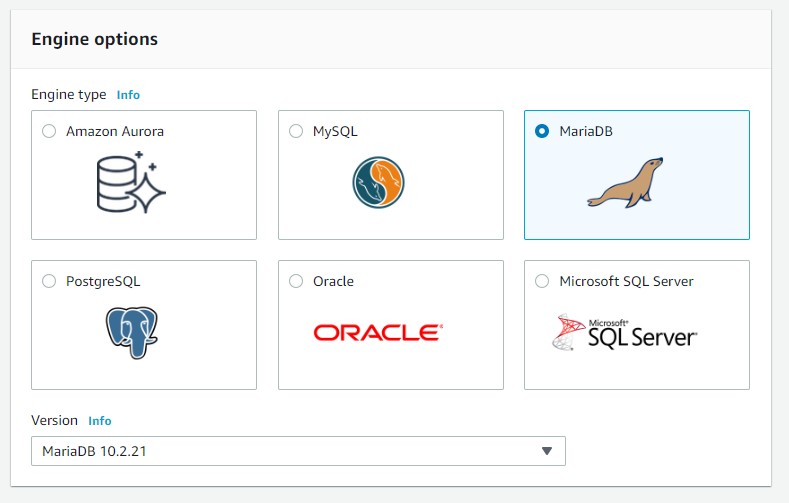
- Configure it according to your requirements. Provide a unique name for your database, admin credentials, etc. Select the Ohio_VPC that one we recently created.
- During setting up the database don’t forget to add it into the Private Subnet.
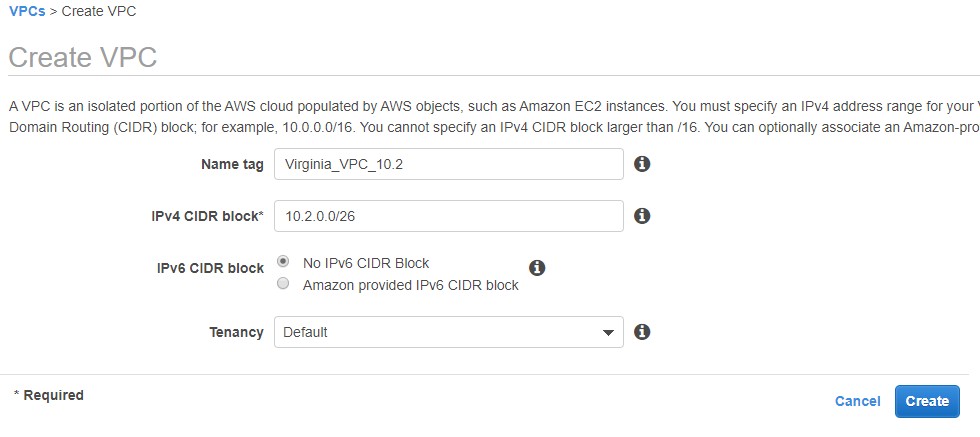
- Configuration of N.Virginia Region
Open N.Virginia Region and create a new VPC
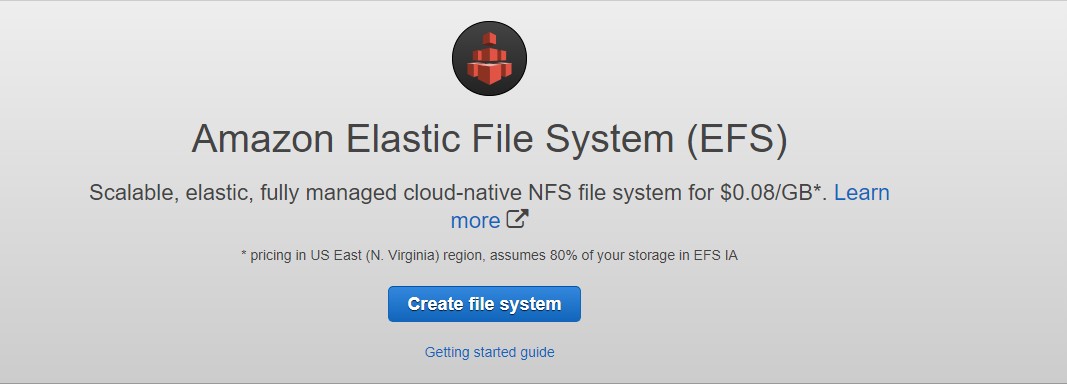
Now, create the subnets in this VPC as well so that we can add our EFS Volume to it.

Create new EFS after accessing the https://aws.amazon.com/efs/.
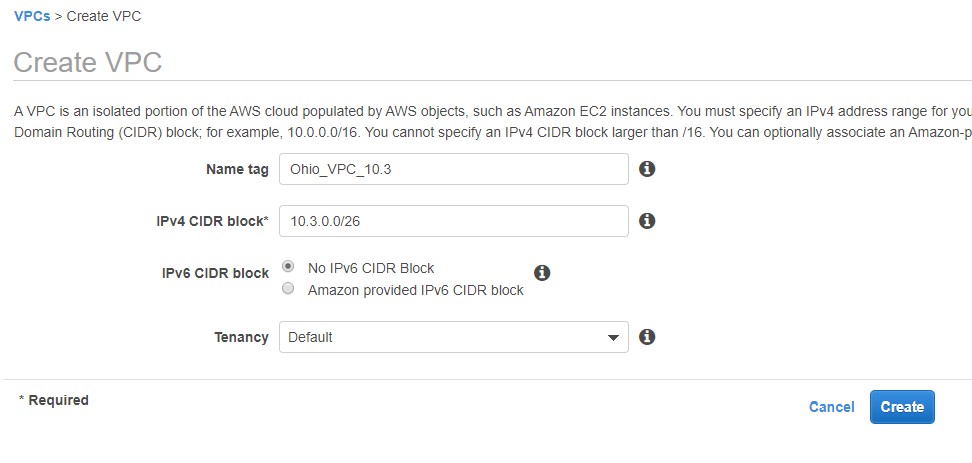
Configuration of Ohio Region
The Ohio Region contains the backbone of the whole project, we need to configure it very carefully so that our project can run without an error. Here we are going to use the following-
VPC Peering
Network Address Translation
Internet Gateway
EC-2 Instance
The route to all other VPCs
And a Public IP.
- Open https://console.aws.amazon.com/vpc/ and create a VPC in the Ohio Region.
Create Two Subnet groups into Ohio VPC, Public and Private.
Public Subnet
Private Subnet
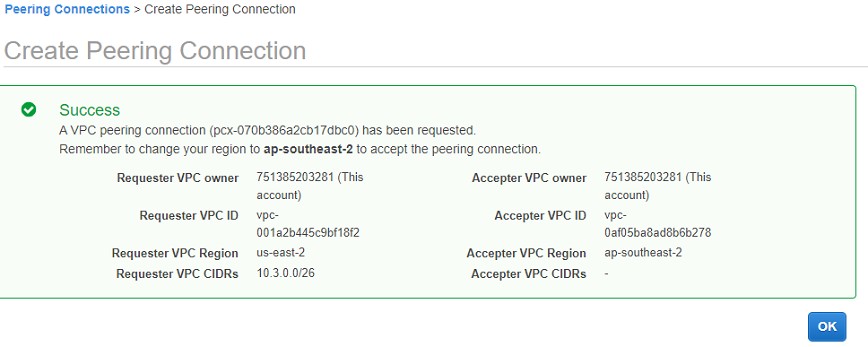
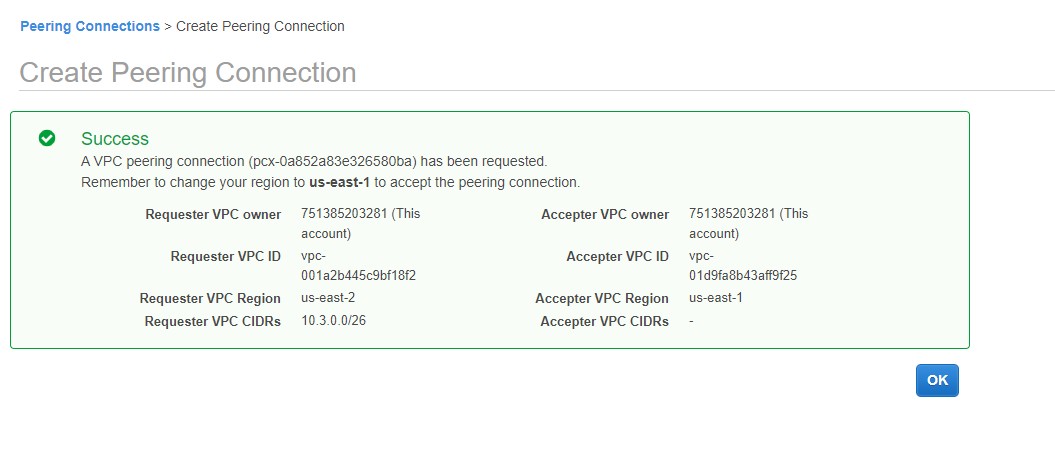
Now we’re going to create the Peering Connection Ohio VPC and we’ll add Sydney_VPC
And N.Virginia VPC into peering list
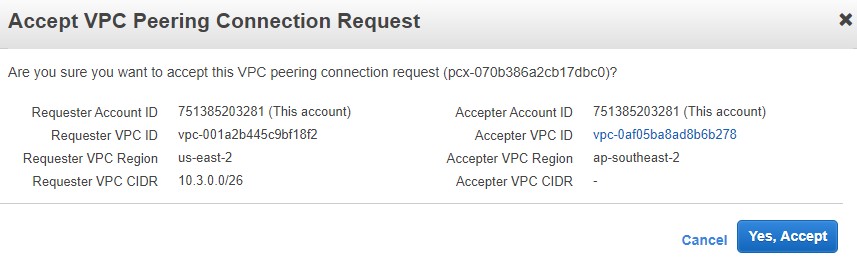
Peering from Ohio to Sydney

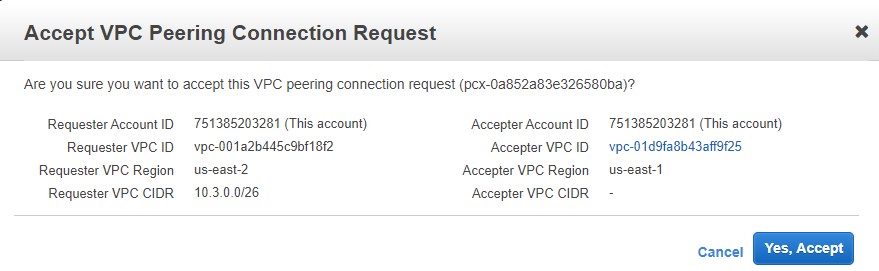
Accept the Peering Request at Sydney_VPC
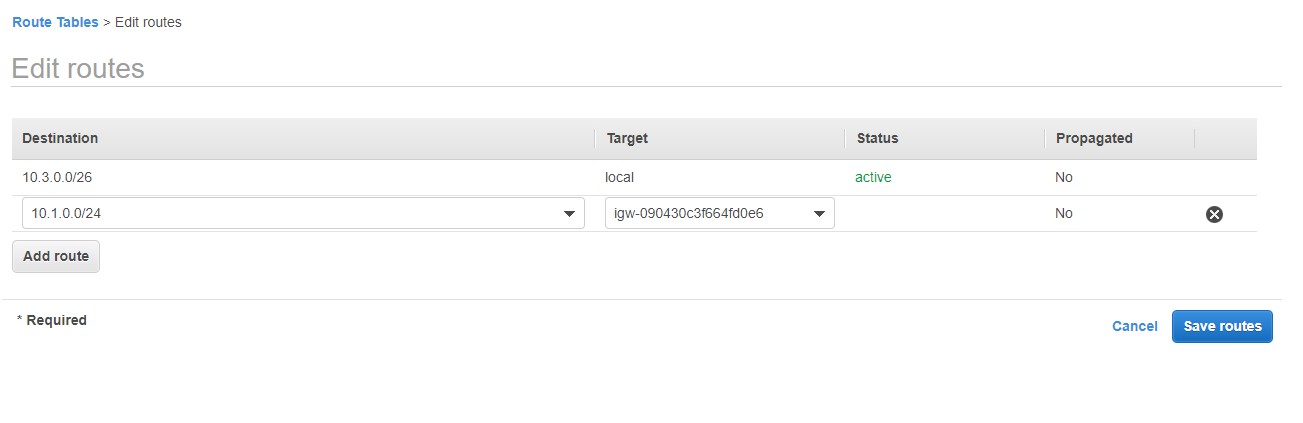
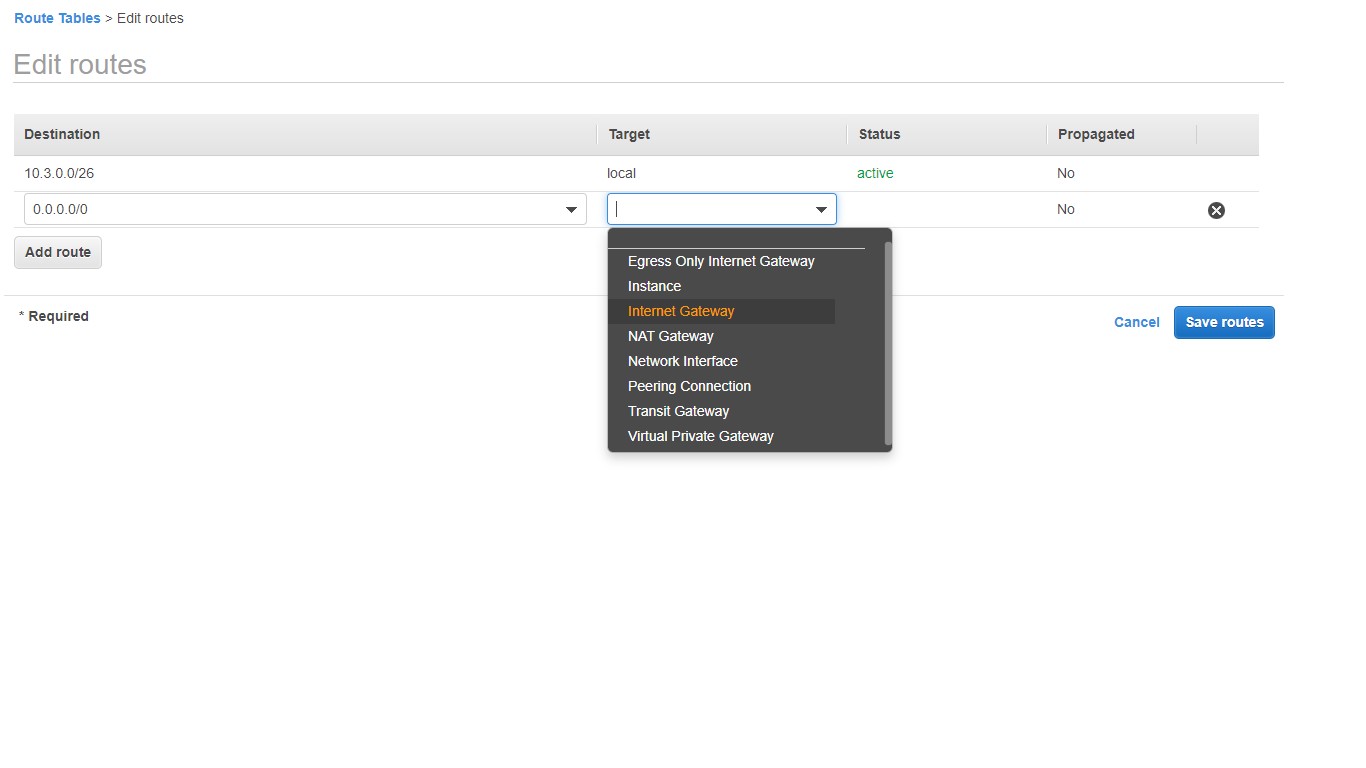
Configure the Routing Table on Ohio_VPC. Add Sydney_VPC IP address and select the corresponding target.

Peering from Ohio to N.Virginia
Accept the Peering Request at Sydney_VPC

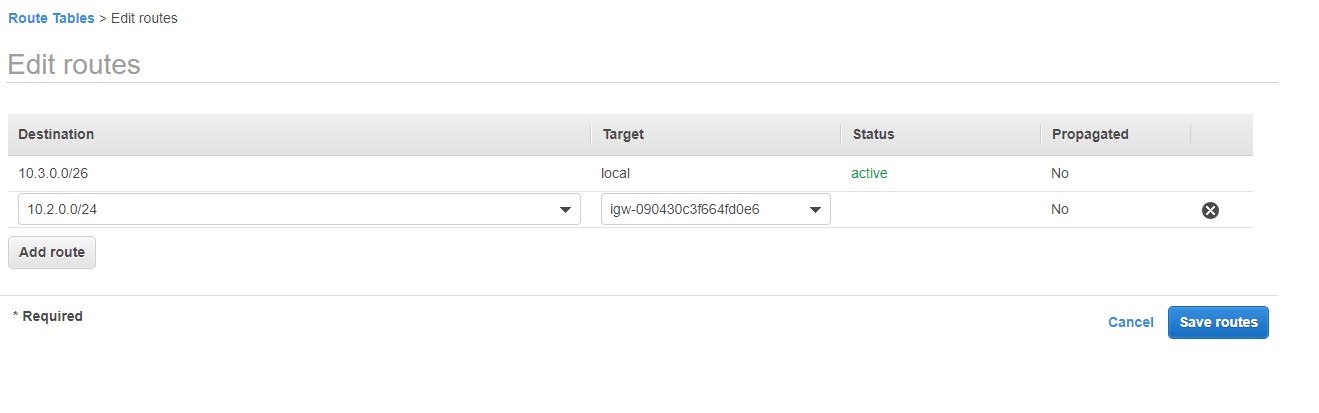
Configure the Routing Table on Ohio_VPC. Add Sydney_VPC IP address and select the corresponding target.
Peering from Ohio to N.Virginia
Accept the Peering request at N.Virginia _VPC
Now, as we Successfully created peering between Ohio_VPC to N.Virginia_VPC, both are connected to each other. The last thing to do is to provide the route between these two VPCs.
Go to
VPCRTCreate Routeand insert all the details like IP Addresses and Target point
Configure the Routing Table between both of the VPCs.
Now all the peering is done among all the VPCs, it's time to create NAT and Provide a Public IP to our Public_Subnet. Select the Internet Gateway on the RoutingTable afterward if you don’t have any public IP then u can assign an IP at the same time while configuring the internet gateway.
Go to https://aws.amazon.com/ec2/ and select Launch Instance.
Select AMI of any type, here I a selecting Amazon Linux 2. You can select Ubuntu, CentOS, Windows Server machine, etc.
Select the Ohio_VPC and the Public Subnet then launch the EC-2 instance.
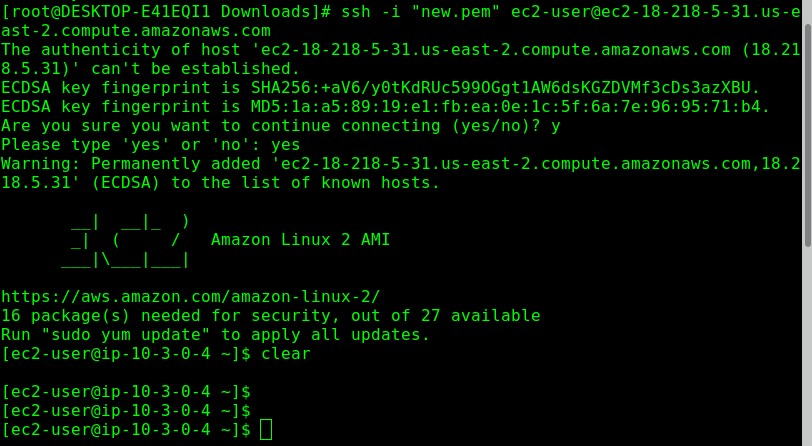
After Successfully launching EC-2 then copy the command to launch it and paste on your Linux terminal
Connect to your EC-2 using SSH. And the user interface in the terminal would look like:
Now the main part of setting up a LAMP server starts form here, mount to EFS volume on your EC-2 instance, and follow the procedure as given below:
[ec2-user@ip-10.3.0.4~]# sudo yum install httpd php php-mysql php-fpm php-cli php-xml php-common php-gd php-imap php-mbstring wget –y
# Download osticket ticket
[ec2-user@ip-10.3.0.4 /efs~]# wget https://github.com/osTicket/osTicket-1.8/releases/download/v1.9.9/osTicket-v1.9.9-1-gbe2f138.zip
[ec2-user@ip-10.3.0.4 /efs ~]# ls
anaconda-ks.cfg osTicket-v1.9.9-1-gbe2f138.zip
An upload directory gets created after unzipping osTicket zip file
[ec2-user@ip-10.3.0.4 /efs~]# ls
anaconda-ks.cfg upload osTicket-v1.9.9-1-gbe2f138.zip
Apache Server Setup:
Copy all data from upload directory to osticket directory in default document root
[ec2-user@ip-10.3.0.4 /efs~]# sudo cp -rv upload/* /var/www/html/osticket/
Change ownership of Sub Files and Directory’s to apache
[ec2-user@ip-10.3.0.4 /efs ~]# sudo chown -R apache /var/www/html/osticket/
Create ost-config.php which is a copy of ost-sampleconfig.php file in the same directory i.e. /var/www/html/osticket/include
[ec2-user@ip-10.3.0.4 /efs~]# sudo cp -rv /var/www/html/osticket/include/ost-sampleconfig.php /var/www/html/osticket/include/ost-config.php
Give full permission to file ost-config.php
[ec2-user@ip-10.3.0.4 /efs~]# sudo chmod -R 666 /var/www/html/osticket/include/ost-config.php
Add the following lines in httpd.conf file to host www.osticket.local site
[ec2-user@ip-10.3.0.4 /efs~]# sudo vim /etc/httpd/conf/httpd.conf
VirtualHost *:80
ServerName www.osticket.local
DocumentRoot /efs
/VirtualHost
[ec2-user@ip-10.3.0.4 /efs~]# sudo setenforce 0
Put following entry for www.osticket.local in /etc/hosts
[ec2-user@ip-10.3.0.4 /efs~]# sudo cat /etc/hosts
127.0.0.1 localhost localhost.localdomain localhost4 localhost4.localdomain4
18.21.5.31 www.osticket.local
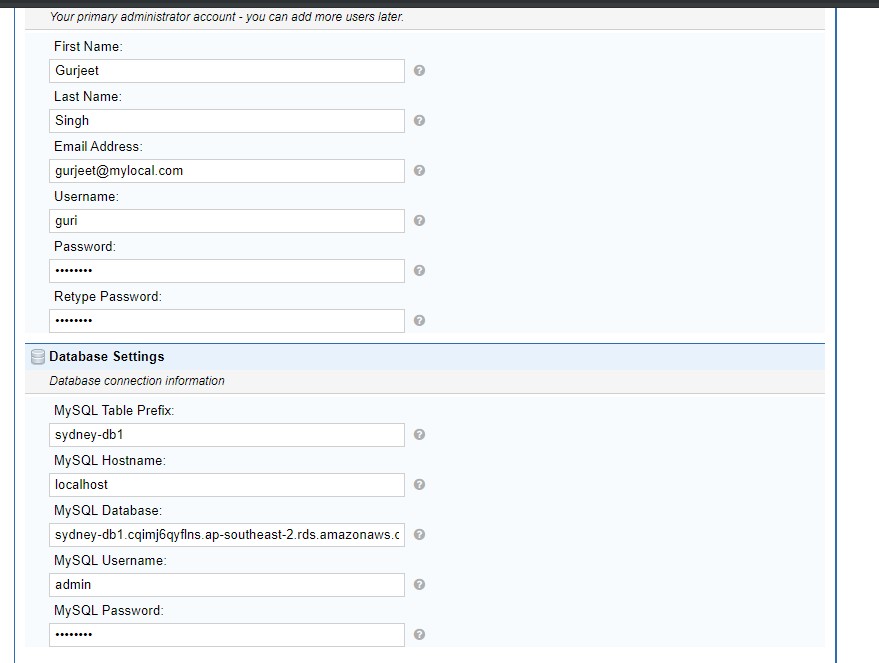
Go to Web-browser and access the osTicket homepage by using your EC-2 public IP. Then a webpage would open look like below enter the details regarding your account.
Add the RDS database that we created in Sydney_VPC, use the public DNS name of the database. Then press continue.
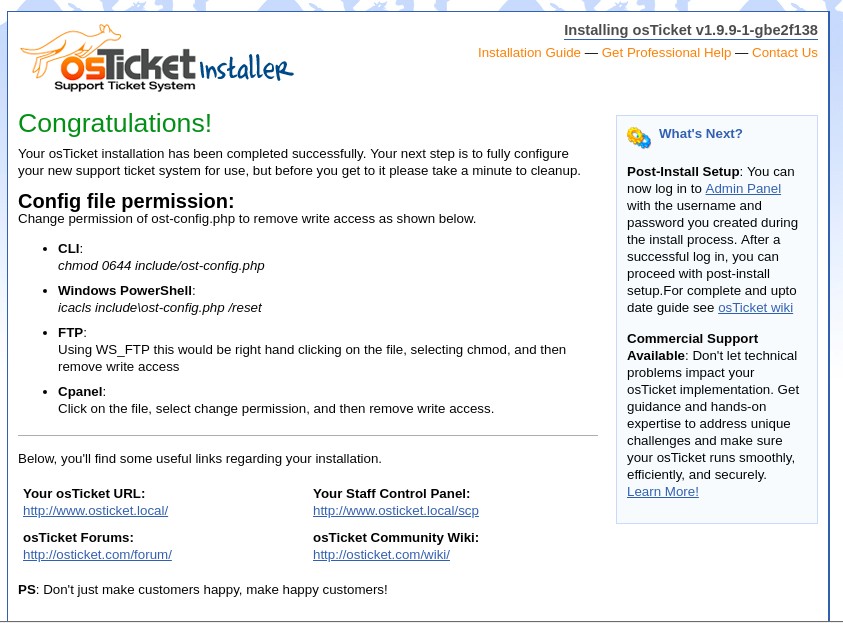
When the database is connected with the osTicket then you’ll see a Congratulations page.
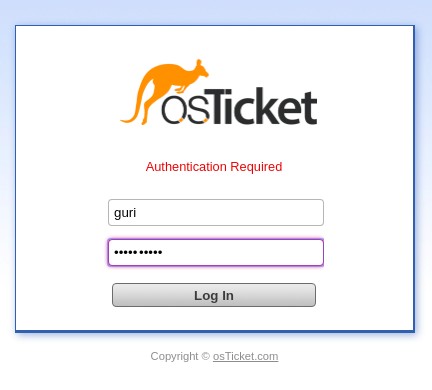
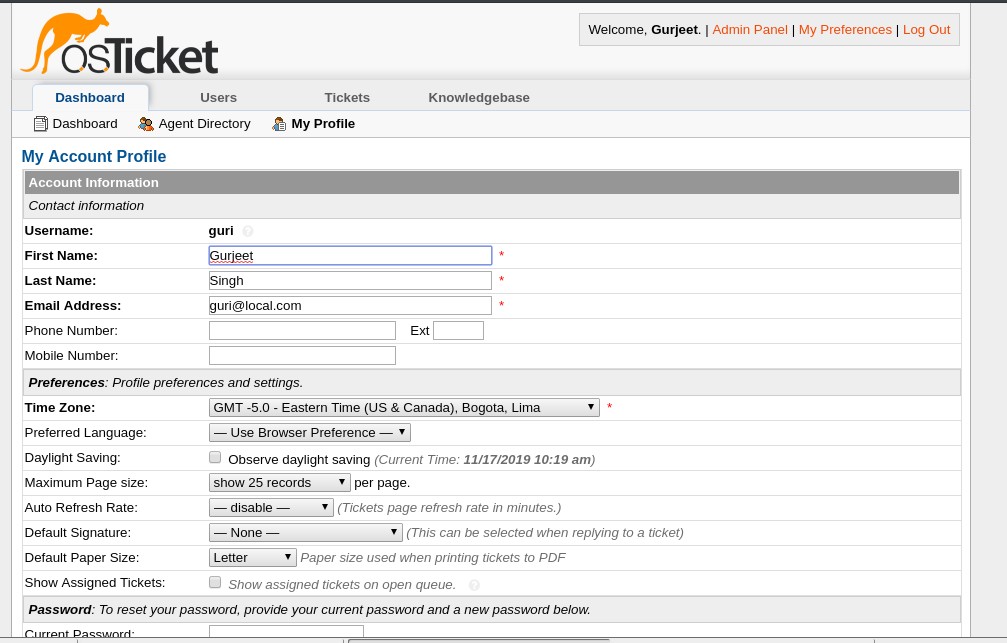
Go to https://www.18.218.5.31/scp and login with your administrative credentials.
When you logged in successfully then you will see a different page where you can manage all the details regarding your staff and can generate tickets/tokens for customers and also could be able to add the agents that are working for your firm.
You have successfully Peered all the VPC Locations and deployed Database, EFS to use among all the Regions.
This one is not a proper and Secure method to deploy your infrastructure but as I am a fresher and still learning things and will soon update everything.
References -
AWS Official Documentaion https://docs.aws.amazon.com/
osTicket https://osticket.com/
CentOS7 https://www.centos.org/
I apologize for the documentations and configurations I am not an advanced user but improving myself by learning day by day.
Thank you.